2015년 12월 3일 목요일

blogspot 에 코드 이쁘게(?) 삽입하기

출처 : https://github.com/google/code-prettify

1. 블로그 설정 > 템플릿 > HTML 편집 클릭

2. <head></head> 태그 사이에 아래 js 링크 삽입
<script src="https://cdn.rawgit.com/google/code-prettify/master/loader/run_prettify.js?lang=css&amp;skin=sunburst"></script>

3. 템틀릿 저장

4. 글쓰기 > html 편집으로 전환

5. 코드 시작과 끝에 <pre class="prettyprint"> 과 </pre> 삽입

6. 게시 후 확인


ps. 기본 설정은 line numbering 이 5줄 마다 표시가 된다.
매 줄 마다 line numbering 을 하려면 아래 css 를

레이아웃 > 템플릿 디자이너 > 고급 > css 추가 에 추가한다.

li.L0, li.L1, li.L2, li.L3,
li.L5, li.L6, li.L7, li.L8
{ list-style-type: decimal !important }

andorid <-> php AES256 en/decode

출처 : http://www.imcore.net/encrypt-decrypt-aes256-c-objective-ios-iphone-ipad-php-java-android-perl-javascript-python/

android AES256Util class

public class AES256Util {
    public static byte[] ivBytes = { 0x00, 0x00, 0x00, 0x00, 0x00, 0x00, 0x00, 0x00, 0x00, 0x00, 0x00, 0x00, 0x00, 0x00, 0x00, 0x00 };

    public static String AES_Encode(String str, String key) throws java.io.UnsupportedEncodingException, NoSuchAlgorithmException, NoSuchPaddingException, InvalidKeyException, InvalidAlgorithmParameterException, IllegalBlockSizeException, BadPaddingException {

        byte[] textBytes = str.getBytes("UTF-8");
        AlgorithmParameterSpec ivSpec = new IvParameterSpec(ivBytes);
        SecretKeySpec newKey = new SecretKeySpec(key.getBytes("UTF-8"), "AES");
        Cipher cipher = null;
        cipher = Cipher.getInstance("AES/CBC/PKCS5Padding");
        cipher.init(Cipher.ENCRYPT_MODE, newKey, ivSpec);

        return Base64.encodeToString(cipher.doFinal(textBytes), 0);
    }

    public static String AES_Decode(String str, String key) throws java.io.UnsupportedEncodingException, NoSuchAlgorithmException, NoSuchPaddingException, InvalidKeyException, InvalidAlgorithmParameterException, IllegalBlockSizeException, BadPaddingException {

        byte[] textBytes =Base64.decode(str,0);
        //byte[] textBytes = str.getBytes("UTF-8");
        AlgorithmParameterSpec ivSpec = new IvParameterSpec(ivBytes);
        SecretKeySpec newKey = new SecretKeySpec(key.getBytes("UTF-8"), "AES");
        Cipher cipher = Cipher.getInstance("AES/CBC/PKCS5Padding");
        cipher.init(Cipher.DECRYPT_MODE, newKey, ivSpec);
        return new String(cipher.doFinal(textBytes), "UTF-8");
    }
}

php function
$AES256KEY = "12345678123456781234567812345678";

function AES_Encode($plain_text) {
    global $AES256KEY;
    return base64_encode(openssl_encrypt($plain_text, "AES-256-CBC", $AES256KEY, true, str_repeat(chr(0), 16)));

}

function AES_Decode($base64_text) {
    global $AES256KEY;
    return openssl_decrypt(base64_decode($base64_text), "AES-256-CBC", $AES256KEY, true, str_repeat(chr(0), 16));
}

webview 로 데이터 전달
try {
    encoeText = Uri.encode(AES256Util.AES_Encode(palinText, aes256key));
} catch (Exception e) {}

String postdata = "enText="+encodeText;
webView.postUrl(URL, postdata.getBytes());

webview 로 전달된 데이터가 복호화가 안된다면 전달하는 값에 +가 포함되어 그럴수도 있더라... 그래서 Uri.encode() 로 전달했다.

JAVA GetLocalpAddress class

public class GetLocalIpAddress {
    public static String GetLocalIpAddress() {
        try {
            for (Enumeration en = NetworkInterface.getNetworkInterfaces(); en.hasMoreElements(); ) {
                NetworkInterface intf = en.nextElement();                
                for (Enumeration enumIpAddr = intf.getInetAddresses(); enumIpAddr.hasMoreElements(); ) {
                    InetAddress inetAddress = enumIpAddr.nextElement();                    
                    if (!inetAddress.isLoopbackAddress() && inetAddress instanceof Inet4Address) {
                        return inetAddress.getHostAddress();                    
                    }
                }
            }
        } catch (SocketException ex) {
            ex.printStackTrace();        
        }
        return null;    
    }
}

2015년 10월 5일 월요일

구글 드라이브 이미지 파일 링크 걸기

구글 드라이브에 이미지 파일을 업로드 후 링크 거는 방법

업로드한 이미지의 공유 링크(웹에 공개 옵션 설정)를 보면

https://drive.google.com/file/d/0B5bKTcV9Y-jBQXVzTDRTYUxiaVE/view?usp=sharing

위와 같이 붉은 색 글씨가 해당 파일의 id 이다.

위 id 를 아래와 같이 www.googledrive.com/host/id 로 이미지 삽입이 가능하다.

예.)
<img src='https://www.googledrive.com/host/0B5bKTcV9Y-jBQXVzTDRTYUxiaVE' />


2016년 8월 31일부로 구글 드라이브 웹 호스팅 서비스 지원이 중단 됨

때문에 위에 처럼 이미지가 보이지 않음 ㅜ_ㅡ

아래는 구글 앱스 관리자 공지 내용 중

지난 해에 사용자와 개발자를 위한 Google 드라이브에서 웹 호스팅 서비스 지원이 중단됨을 알려드린 바 있습니다. 2016년 8월 31일부터는 googledrive.com/host/[id]를 통한 콘텐츠 제공이 중단됩니다.
Google 기록에 따르면 조직의 사용자가 드라이브에서 웹페이지를 호스팅하고 있습니다. 최근 몇 주 동안 드라이브 웹 호스팅을 통해 제공된 공유 항목을 기록한 CSV 파일이 첨부되어 있습니다.
드라이브의 웹 호스팅 서비스를 대신할 수 있는 방법은 다음과 같습니다.
Drive API: 로그인한 사용자에게 공개 드라이브 항목에 대한 액세스 권한을 제공하기 위해 웹 호스팅 기능을 사용 중이면 대신 Drive API를 사용할 수 있습니다.
Firebase 호스팅: 사용자에게 드라이브에 있는 콘텐츠에서 정적 웹페이지에 대한 액세스 권한을 제공하기 위해 웹 호스팅 기능을 사용 중이면 Firebase로 이전할 수 있습니다. 이전하려면 Firebase로 콘텐츠를 업로드하고 Firebase 고유 URL을 통해 페이지를 제공합니다.
Google Cloud Platform: 이미 Google Cloud Platform 고객이면 Google Cloud Platform 정적 웹사이트 호스팅으로 이전하는 것이 좋습니다.
8월 31일까지 업데이트하지 않으면 웹 호스팅 기능을 통해 제공되는 파일을 로드할 수 없게 됩니다.
문의사항이 있는 경우 Google Apps 지원팀에 문의하시기 바랍니다.


2015년 9월 8일 화요일

Ubuntu 14.04 xrdp 사용하기


1. install xRDP

sudo apt-get update
sudo apt-get install xrdp

2. install XFCE4

sudo apt-get install xfce4

3. configure xRDP

echo xfce4-session > ~/.xsession

sudo cp /etc/xrdp/startwm.sh /etc/xrdp/startwm.sh.old
sudo nano /etc/xrdp/startwm.sh

마지막 줄에 있는 . /etc/X11/Xsession 삭제
마지막 줄에 다음과 같이 추가

startxfce4
#!/bin/sh
if [ -r /etc/default/locale ]then  . /etc/default/locale  export LANG LANGUAGEfi
startxfce4

4. restart xRDP

sudo service xrdp restart

참고 링크 : http://www.tweaking4all.com/software/linux-software/use-xrdp-remote-access-ubuntu-14-04/


2015년 8월 10일 월요일

Windows 10 업그레이드 후 EDGE 오류

Windows 10 업그레이드 후 EDGE 브라우져에서 주소를 입력해도 빈 화면이 나오는 경우가 있다.

동일 증상을 업그레이드 후 확인하여 검색해보니 클리앙에 해결 방법이 있었다.

원본 링크는 아래와 같다.

http://www.clien.net/cs2/bbs/board.php?bo_table=lecture&wr_id=282538

해결 방법은 레지스트리 편집기에서 아래 경로로 이동 후

\HKEY_CURRENT_USER\SOFTWARE\Classes\Local Settings\Software\Microsoft\Windows\CurrentVersion\AppContainer\Storage\microsoft.microsoftedge_8wekyb3d8bbwe

우클릭 사용 권한을 선택한다.

그룹 또는 사용자 이름에서 S-1... 으로 시작하는 계정들에게 모든 권한을 부여한다.


이후 EDGE 브라우져에서 주소 입력 시 정상적으로 사이트 접근이 가능해졌다.


2015년 6월 10일 수요일

Command(cmd) code page 변경 - chcp

windows CMD(command) 창에서 UTF-8 을 사용하고자 할때는?

command 창에서 아래와 같이 입력하여 utf-8 로 변경이 가능하다.

chcp 65001

command 창에서 chcp 를 입력하면 현재 코드 페이지를 확인 할 수 있다.

한글 windows 의 경우 949 가 default 다.

아래 링크에서 code page 목록을 확인 할 수 있다.

http://en.wikipedia.org/wiki/Code_page

Editplus 에서 Python 실행 하기

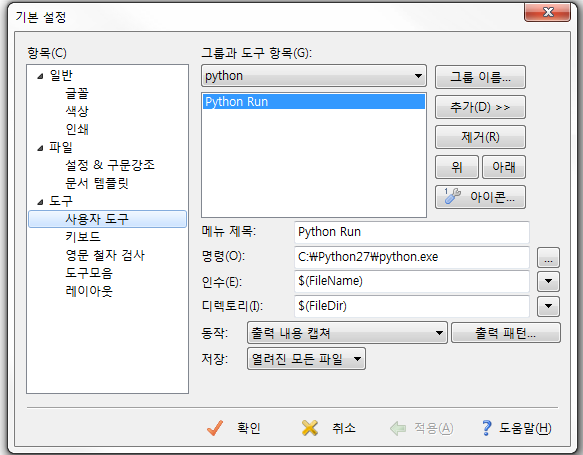
Editplus 에서 Python 실행 설정


도구 > 사용자 도구 구성 > 추가

메뉴제목 : Python Run
명령 : python 설치 경로 지정
인수 : 파일이름 선택
디렉토리 : 파일 디렉토리 선택
동작 : 출력 내용 캡쳐
출력 패턴 : 기본 출력 패턴 사용 uncheck
    정규식 : File "(.+)", line ([0-9]+)
    파일이름 : 태그로 표시된 식 1
    줄 : 태그로 표시된 식 2
    칸 : 없음
저장 : 열려진 모든 파일 or 현재 파일


[Python] SyntaxError: Non-ASCII character ~

---------- Python Run ----------
  File "utf8.py", line 5
SyntaxError: Non-ASCII character '\xeb' in file utf8.py on line 5, but no encoding declared; see http://python.org/dev/peps/pep-0263/ for details
출력 완료 (0초 경과) - 정상 종료

utf-8로 저장된 python 파일 실행 시 위와 같은 에러가 발생할 수 있다.

그럴때는 소스 코드 최상단에 아래와 같이 선언을 해 준다.
# -*- coding: utf8 -*- 
or
# coding=coding: utf8
or
# vim: set fileencoding=utf8 :
python 의 기본 인코딩이 ASCII 로 되어 있어서 소스 코드 상단에 인코딩 정보를 알려줘야 한다.


출처 : http://python.org/dev/peps/pep-0263/

2015년 4월 22일 수요일

HUAWEI E3372 LTE 모뎀 SKT 개통

AliExpree 에서 구매한 HUAWEI E3372 LTE 모뎀을 금일 수령 후 개통 완료했다.

E3373 LTE 모뎀 스펙은 다음과 같다.
Product Description:
HUAWEI E3372 FDD 800/900/1800/2100/2600 Mhz Free shipping Singapore post
original HUAWEI E3372  Neutral packing
Detailed Specifications: HUAWEI E3372

Frequency band:
-(4G) LTE FDD 800/900/1800/2100/2600MHz
-(3G) DC-HSPA+/HSPA+/UMTS 900/2100MHz
-(2G) GSM/GPRS/EDGE 850/900/1800/1900MHz

*Support:LTE FDD900/800/1800/2100/2600 MHZ  5M/10M/15M/20M bandwidth
*Hi-Link Technology,plug & connect
*LTE FDD downlink data service of up to 150Mbps@20M bandwidth
*Size:80*30*13mm
*Weight:<35g
*Micro SD card Slot

Support system/requirement:
 -Windows XP SP3,Windows Vista SP1/SP2, Windows 7, Windows 8 (Does not support Windows RT) , Mac OS ×10.6,10.7 and 10.8 with latest upgrades .
-Hardware system should meet the recommended requirements for the installed OS version.
-Standard USB interface .
실제 크기는 넓적하고 크다!


맥북에 연결 시 옆에 USB 를 연결하지 못 할정도....

SKT 분당지점에서 데이터 함께쓰기 신청 후 USIM 수령하고 노트북에 연결했으나...
Connection Failed....

그냥 되는것은 없는가보다. Connection Profile 을 설정해줘야 한단다.
Settings > Profile Management > New Profile
User Name 과 Password 는 생략하고 APN 입력란에
lte-internet.sktelecom.com
입력 후 System > Reboot

이후 연결 확인 ^0^


속도 체크를 해봤지만... 어째 사무실 WIFI 보다 느린것 같은......

설정은 맥북 요세미티에서 했습니다. 끝.


2015년 4월 17일 금요일

OS X Yosemite 에서 Juniper NC 설치 오류 발생 시

OS X Yosemite 에서 Juniper NC(NetworkConnect) 설치 시 오류가 발생한다면...

sudo nvram boot-args="kext-dev-mode=1"

입력 후 NC 파일을 직접 받아서 설치하도록 한다.

NC 파일은 다음 링크에서 받을 수 있습니다.

https://yourdomainname/dana-cached/nc/NetworkConnect.dmg

위에서 추가한 kext-dev-mode 삭제 방법

sudo nvram -d boot-args